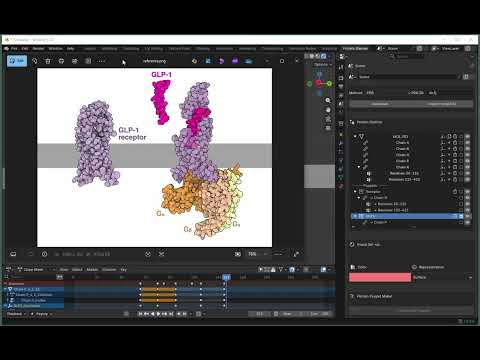
Keyframe Animation
Create animations by keyframing puppet positions, poses, and colors.
Watch the full tutorial:
What is Keyframing?
Keyframing is the process of defining specific values at specific points in time. Blender automatically interpolates between keyframes to create smooth animation.
In ProteinBlender, you can keyframe:
- Puppet positions (location, rotation, scale)
- Poses (apply different conformations)
- Colors (change appearance over time)
Animation Panel
The Animation panel provides tools for creating keyframes.
Panel Sections
- Puppet Selection: Choose which puppet to animate
- Keyframe Options: Select what to keyframe (Location, Rotation, Scale, Pose, Color)
- Create Keyframe button: Adds keyframe at current frame
Creating Your First Animation
Simple Position Animation
-
Select a puppet from the dropdown in Animation panel
- Set first keyframe at frame 1:
- Move to frame 1 in timeline (bottom of screen)
- Position the puppet where you want it to start
- Check Location in Keyframe Options
- Click Create Keyframe
- Set second keyframe at frame 60:
- Move to frame 60 in timeline
- Move the puppet to a different position
- Check Location
- Click Create Keyframe
- Play animation:
- Press Spacebar or click Play in timeline
- Watch the puppet move smoothly from start to end position
Keyframe Options
Location, Rotation, Scale
- Location (L): Keyframe position in 3D space
- Rotation (R): Keyframe rotation angles
- Scale (S): Keyframe size changes
You can keyframe any combination:
- L + R: Movement and rotation
- L + R + S: Full transformation
- Just R: Rotation in place
Pose
The Pose option works with your saved poses:
- Create poses in Pose Library (see Manage Poses)
- At keyframe 1: Apply Pose A, check Pose, create keyframe
- At keyframe 60: Apply Pose B, check Pose, create keyframe
- Blender interpolates between the two conformations!
Important: Pose must be applied BEFORE creating the keyframe.
Color
Animate color changes:
- At keyframe 1: Set color in Visual Setup, check Color, create keyframe
- At keyframe 60: Set different color, check Color, create keyframe
- Domain smoothly transitions between colors
Advanced Animation Workflows
Conformational Change Animation
- Create poses for different states (e.g., Open, Closed)
- Timeline:
- Frame 1: Apply “Open” pose, keyframe Pose
- Frame 30: Apply “Closed” pose, keyframe Pose
- Frame 60: Apply “Open” pose, keyframe Pose
- Result: Protein opens and closes smoothly
Multi-Property Animation
Combine multiple properties for richer animations:
Frame 1:
- Position puppet at (0, 0, 0)
- Apply “Unbound” pose
- Set color to blue
- Keyframe: Location + Pose + Color
Frame 60:
- Position puppet at (10, 0, 0)
- Apply “Bound” pose
- Set color to red
- Keyframe: Location + Pose + Color
Result: Protein moves, changes conformation, and changes color simultaneously.
Multi-Puppet Coordination
Animate multiple puppets in the same scene:
- Puppet A (Enzyme):
- Keyframe at frames 1, 30, 60
- Puppet B (Substrate):
- Keyframe at frames 1, 30, 60
- Coordinate timing to show binding
- Result: Choreographed interaction between proteins
Timeline Tips
Navigating the Timeline
- Scrub: Drag the blue playhead to preview
- Jump to frame: Click in timeline or type frame number
- Play: Spacebar
- Step forward/back: Left/Right arrow keys
Frame Rate
- Default: 24 frames per second (fps)
- 60 frames = 2.5 seconds of animation at 24fps
- Adjust in Output Properties panel
Editing Keyframes
Graph Editor
For precise control over interpolation:
- Switch an editor to Graph Editor
- Select your puppet object
- See keyframes as curves
- Edit curves to control animation timing
Dope Sheet
For overview of all keyframes:
- Switch an editor to Dope Sheet
- See all keyframes across timeline
- Move, copy, or delete keyframes
Rendering Animation
Once you’re happy with the animation:
- Set output format in Output Properties
- Set frame range (start and end frames)
- Choose output path
- Render > Render Animation (Ctrl+F12)
Common Animation Scenarios
Protein Folding
- Create poses: Unfolded, Intermediate, Folded
- Keyframe pose transitions
- Add rotation for visual interest
Enzyme-Substrate Binding
- Puppet 1 (Enzyme): Static or small movement
- Puppet 2 (Substrate): Approaches enzyme
- Both change to “Bound” pose when close
- Color changes to show activation
Conformational Dynamics
- Create multiple poses representing motion
- Keyframe through poses in sequence
- Loop by returning to first pose at end
Tips and Best Practices
Planning
- Sketch out key moments before keyframing
- Create all necessary poses first
- Test timing with rough keyframes
Timing
- Fast movements: Fewer frames between keyframes
- Slow movements: More frames between keyframes
- Hold pose: Create two keyframes at same position
Smooth vs. Mechanical
- Use Graph Editor to adjust curves for natural motion
- Ease-in and ease-out for realistic acceleration
- Linear interpolation for mechanical movements
Performance
- Complex animations may slow viewport playback
- Reduce viewport complexity while animating
- Final render will be smoother
Troubleshooting
Keyframe Not Created
- Check that a puppet is selected
- Make sure at least one option is checked (Location, Rotation, etc.)
- Look for error messages in console
Animation Jumps Instead of Interpolating
- Make sure you have keyframes at both start and end
- Check that you’re keyframing the same properties
- Verify puppet wasn’t deleted/recreated between keyframes
Pose Changes Don’t Animate Smoothly
- Poses must have same puppets
- Objects in poses must exist at both keyframes
- Check that pose was applied before keyframing
Color Doesn’t Animate
- Color keyframes affect geometry node inputs
- Make sure Color option is checked when keyframing
- Verify domain has material
Next Steps
You now have the tools to create complete protein animations!
For more advanced topics:
- Update Visuals - Advanced coloring techniques
- Manage Poses - Creating complex pose libraries
Resources
- Blender Animation Manual: https://docs.blender.org/manual/en/latest/animation/
- Graph Editor: https://docs.blender.org/manual/en/latest/editors/graph_editor/
- Rendering: https://docs.blender.org/manual/en/latest/render/
| Back to Home | Previous: Manage Poses |
