Installation Guide
ProteinBlender can be installed in two ways: through the extension repository (recommended) or manually from a zip file.
Requirements
- Blender 4.2 or newer
- Operating System: Windows, macOS, or Linux
- Internet connection (for initial installation and updates)
Option 1: Extension Repository (Recommended)
The extension repository provides automatic update notifications and one-click updates.
Step 1: Add the Repository
- Open Blender (4.2 or newer)
- Go to Edit -> Preferences
- Navigate to the Get Extensions section
- Click on the Repositories dropdown at the top
- Click the + (plus) button
- Select Add Remote Repository
Step 2: Configure Repository
Enter the following information:
- URL:
https://animation-lab.github.io/ProteinBlender/extensions/index.json
Click OK to save.
Step 3: Install ProteinBlender
- Return to the main Get Extensions view
- Make sure the ProteinBlender repository is selected in the dropdown (it may be named “animation-lab.github.io”)
- Find ProteinBlender in the extensions list
- Click Install
- Wait for the installation to complete
- Restart Blender
Step 4: Enable Auto-Updates (Optional)
- Go to Edit -> Preferences -> Get Extensions -> Repositories
- Select the ProteinBlender repository
- Enable Check for Updates on Start
Blender will now automatically notify you when updates are available.
Option 2: Manual Installation
If you prefer to install manually or are having issues with the repository:
Step 1: Download
- Go to the Releases page
- Download the latest .zip file for your platform:
- proteinblender-X.X.X-windows-x64.zip (Windows)
- proteinblender-X.X.X-linux-x64.zip (Linux)
- proteinblender-X.X.X-macos-arm64.zip (Mac M1/M2)
- proteinblender-X.X.X-macos-x64.zip (Mac Intel)
Step 2: Install in Blender
- Open Blender
- Go to Edit -> Preferences -> Get Extensions
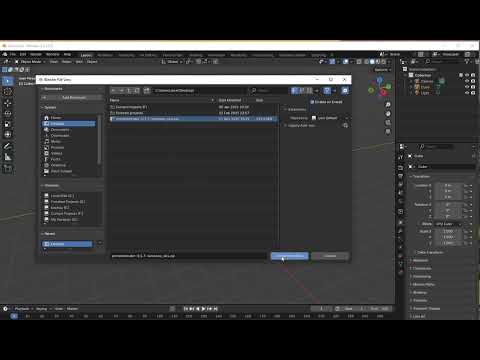
- Click Install from Disk (top-right corner)
- Navigate to and select the downloaded .zip file
- Click Install from Disk
- Restart Blender
Note: Manual installation does not provide automatic update notifications.
Verifying Installation
After restarting Blender:
- Open a new project or create a blank scene
- Look for the ProteinBlender workspace tab at the top
- Or press N in the 3D viewport to open the sidebar
- You should see ProteinBlender panels
If you see the panels, installation was successful!
Click below to watch a tutorial on how to install ProteinBlender:
Troubleshooting
Extension Doesn’t Appear
- Verify you’re using Blender 4.2 or newer
- Check that you restarted Blender after installation
- Try Edit -> Preferences -> Get Extensions and look for ProteinBlender in the list
Repository Cannot Be Accessed
- Check your internet connection
- Verify the repository URL is correct
- Try clicking the refresh button in the repositories list
Installation Fails
- Check Blender’s system console for error messages
- Try manual installation from zip file instead
- Report issues at GitHub Issues
Dependencies Not Installing
ProteinBlender automatically installs required dependencies on first load. If you see errors:
- Check that you have internet access
- Wait for dependency installation to complete (may take 1-2 minutes)
- Restart Blender if installation completes
- Check the Blender console for specific error messages
Uninstallation
To remove ProteinBlender:
- Go to Edit -> Preferences -> Get Extensions
- Find ProteinBlender in the list
- Click the dropdown arrow next to the extension
- Click Remove
- Restart Blender
Next Steps
Now that ProteinBlender is installed, learn how to:
- Import Proteins - Load your first protein structure
- Update Visuals - Customize how proteins look
| Back to Home | Next: Import Proteins |